
by
Budd Davisson, exclusively for Airbum.com
Part Five:
Getting in Touch With our Butt
by
Budd Davisson, exclusively for Airbum.com
Part Five:
Getting in Touch With our Butt
I’m not sure how to characterize fitting a butt plate that is as complex as that on a Kentucky. I’m tempted to say it’s a pain in the butt, but that’s too obvious. What I will say is that it almost doesn’t make any difference whether it’s a kit or a scratchbuilt because unless it’s machined turned to a given butt plate, you’re going to have about the same amount of work to do regardless.
A couple notes about Kentucky-type butt plates in general
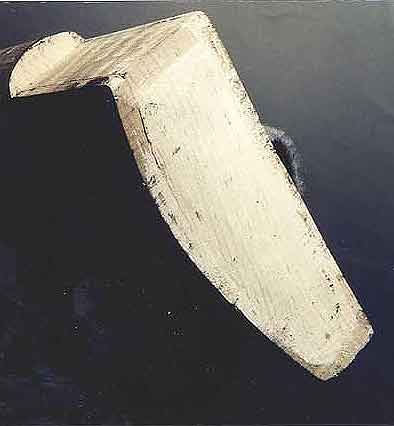
First of all, a butt plate is not just a butt plate. They each have their own characteristics and style. On top of that, the stylistic progression of butt plates from old to not-so-old is seamless. The flat, wide, good-for-stompin’-heads butt plates of the old German Jaegers slowly mutated into the mildly curved, wonderfully graceful, wide plates of the late 1700’s to the skinny, ridiculously curved and painful-to-shoot units of the 1840’ & ‘50’s. For the most part, you can look at a butt plate and, with an 80% guarantee of success, place it within 25 years of its date of origin from the beginnings right up until muzzleloaders left the scene. In the case of most golden age Kentuckies, you can even come within 50 miles of its location. The pros can nail it down much closer than that.
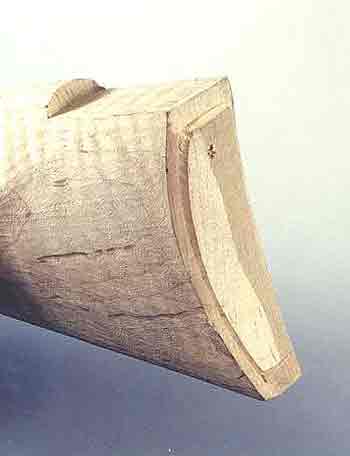
Most of the butt plates share a couple of characteristics, however: they are curved to some degree and they feature a return on the top of the stock. What this means to the wood worker is that the plate must be inlet in three directions at one time. The return has to come down into the stock and forward which moves the curve of the plate itself the same direction. Look at the geometry of what’s going on. It’s actually pretty complex.
 |
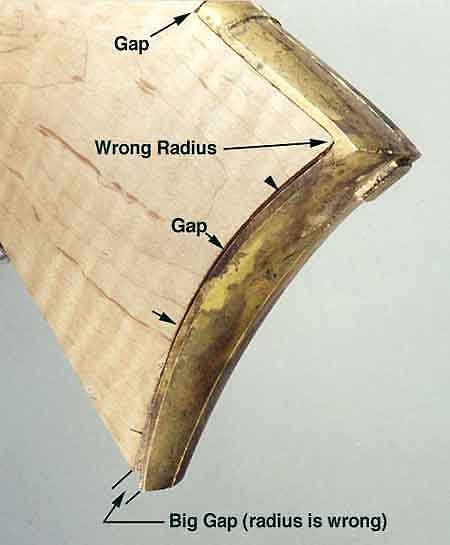 |
The small gaps and the radius problem at the heel of the stock (top corner) are no big problem. They’ll disappear in the course of solving the big gap at the toe.
Methods of removing wood
Removing wood on end grain can be problematic because even with a hyper-sharp chisel, it’s hard to control to any degree of accuracy. For that reason, plan on viewing the outer 1/4-5/16” of the area where the butt plate actually makes contact as being sacrosanct and we’re going to treat it very carefully. Everywhere in between it’s up for grabs as to how carefully you want to do it.
I suppose if you want, you could take a humungous spade bit on a drill and simply under cut it all. The theory here is that no one is going to see anything but the very outer surface where the metal meets the wood, so anything inside is invisible and doesn’t count. Although it would greatly speed things up, I can’t do it that way.
I like to walk into my shop and, regardless of the status of an uncompleted project, regardless of what it is; I like to be proud of it. Without getting too fastidious about it (actually, I’m from Nebraska where few of us even use words with that many syllables), I like the insides of my projects to reflect the same care lavished on the outside (go to The Roadster Chronicles elsewhere in Airbum.com and you’ll see the same “problem” I have in this area).
If I walked into the shop and saw the area under the butt plate simply hogged down so it would clear with no effort at finishing it, it would depress me. Further, every time I picked up the finished rifle, I’d keep seeing through the butt plate to a messy area and I couldn’t enjoy the rifle as much. That, however is a VERY personal attitude and not one I suggest anyone else follow. This is also why some of my projects take so much longer than they should.
Getting rid of the big clump
Before we can do anything, we have to get rid of the big lump of wood in the middle of the area butt. It’s a lot to remove with hammer and chisel, plus I don’t any “normal” sized chisels—they are all small. So, I opted for a thoroughly non-traditional approach. I put a 60-grit sanding disk on my trusty 4” angle-head Makita grinder and carefully went after it.
I use that grinder for so many different operations in so many different mediums (it’s my prime cutting tool and metal remover for heavy steel construction) that I’ve gotten to where I’m really comfortable with super close, fine operations. However, be advised: that sucker could easy get away from you in this kind of operation and put a helluva gouge in one of the mating surfaces right where you don’t want it.
Even though I’m comfortable in the extreme with the tool, I still put three layers of duct tape over the mating surfaces to protect them. It wouldn’t be bulletproof protection, but at least it would keep the damage to a minimum.
In about five dusty minutes I had the lump reduced to a much more manageable size and I was ready to move on to my primary wood removal system for butt stocks: using a big chisel as a scraper.
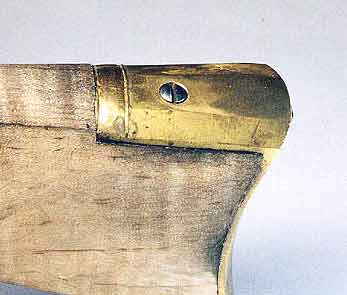
True up the butt plate
Although we can inlet to correct for any irregularities in the casting, it’s better to true it up as much as we can because it’s much easier to inlet smooth, regular surfaces.
 |
 |
In this case, the inside surface of the butt plate has casting ridges and some areas that aren’t very even. So, we’ll take a big mill file and, laying it across the butt plate so we’re doing both surfaces at one time, gently smooth them down
Be very careful when you’re working up into the small radius at the top that you don’t leave some nicks in the corner from the file. Stay a little way away from that area and clean it up with a small round file (a file used for sharpening chain saws works great).
Be especially critical what you’re doing with the bottom of the return. Try your darndest to make the two flats perpendicular to a line you’ve drawn on the inside of the plate with a felt tip pen. If the surfaces are off even a little, they’ll swing the toe of the plate one way or another. We can easily inlet those surfaces so the plate is square on the stock, but it’s easier if we start out with square surfaces on the butt plate to begin with.
Beginning the LONG process
One of the things that makes this such a long process is that even though I know we have to remove 3/16” of wood, which is a helluva lot of wood, especially when it’s end grain, I’m not crazy about going after it with a band saw or the grinder thinking I’ll take off 1/8” fast and the last little bit slowly. Far too many times I’ve taken that approach and realize too late that there was some little nuance I missed and it caused me much more work. So, I start creeping up on it right from the beginning. I’m certain the big guys do it differently.
The first thing we want to do is chin the plate on the upper return notch and verify that the angle of the notch holds the top of the butt plate at an angle that follows the comb of the stock. We want it to be a flowing visual line from the nose of the stock, right behind the wrist, all the way to the heel. A butt plate that’s at an angle to the top line of the stock sticks out like a third eye.
You also want to be critical of that angle because if the front of the butt plate return is down by even a few thousands, it pivots the plate on the heel of the stock and pulls the very bottom of the plate out quite a bit.
Put marks (felt tip pen) in the middle of the butt plate at both ends and have matching centerline marks on the stock itself. If you have extra wood, flush the plate to the left side of the stock to increase the cast-off (angle the butt slightly towards you to off set the centerline right for better sighting. This is not important.).
The lines on the bottom of the butt and the butt plate have to be watched carefully while you’re truing up the flats for the return so the plate remains vertical.
Now we’re ready to start with the black transfer medium. Brush it on the butt plate, lay the butt plate in position and tap it lightly with a block of wood or mallet. Remove it and locate the high spots. This is where I probably depart from the ways other guys do it.
 |
I remove the high spots by using a heavy 1/4” chisel as a scraper. It’s super stiff and, because it’s a full sized chisel with the blade formed as part of the tang that goes clear through the handle, I can really get a good grip on it. You can actually remove a lot of wood quickly this way, but that’s not the goal. The goal is to remove just the local high spots and the 1/4” size helps in that regard.
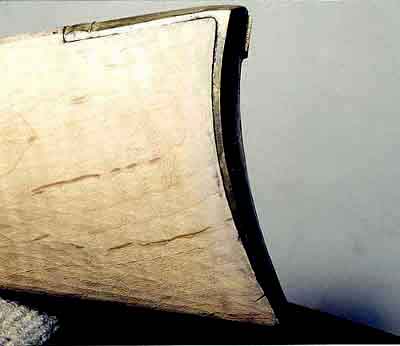
One of the first things you’ll have to do as the plate moves forward is to VERY gingerly form a radius on the upper rear corner (heel) of the stock. Fight the urge to cut that to what you think is the right radius ahead of time. The marks made by the butt plate in that area are very clear and very specific. They are also easy to remove just a hair at a time. For this you use one of your inletting chisels and actually cut the sliver of wood away, going from right to left.
Because the butt plate will contact the wood for only about 1/4” around the edges, you’ll wind up with what look like little trails running around the stock that are carefully smoothed by scrapping. At the heel, where the small radii are, the trails will be especially noticeable.
Again, don’t rush. This is another of those areas where even the tiniest gaps show so we don’t want to chop away too much wood. Put a stack of good CD’s in the player, have a supply of your favorite beverage handy and resolve that this will be done when it gets done.
It can really be a mind numbing process so figure on doing it in two or three, three-hour sessions to minimize the brain damage and ensuing mistakes.
Screwing it together
At some point you’re going to finally have this thing inletted to the point that you’re happy with it and it’s time to put the screws in.
Like everything else, there’s a long way to do this that’ll save you some grief and shorter ways that may or may not cause you grief.
The problem is that the hole in the top of the stock has to be in exactly the right spot and the holes counter sunk correctly or, when you tighten the top screw, it can move the butt plate back slightly and undo all of your careful wood work.
The method I use is to drill 1/8” holes, one in the proper location on the mid-line of the return and a distance up from the toe. When drilling these holes remember to try to keep them vertical to the surface in question. For the back hole, that means going in at an angle that matches the curve of the butt plate.
The final wood screws you’ll be using are much bigger than 1/8” but we use the smaller size as guide holes.
 |
 |
Assuming you’re doing a brass-mounted (not iron-mounted) rifle, the brass butt plate is quite soft and easily bent. So, get it more or less inletted with gaps still showing and then, screw it down. Then, using something like a 1” steel bar as a hammer, gently pound the edges into position. You’ll have to file and sand the outside surface of the butt plate anyway to smooth up the casting, so any hammer marks will disappear.
I don’t know if the plate would have deformed enough to take up the entire 3/16” gap we originally had at the toe or not. I think I’d be afraid to move it that far. A disruption in the line of the butt plate MIGHT be noticeable.
Don’t use a regular hammer for this operation because the marks will be too abrupt. In fact, the bigger the diameter of your hammering instrument the wider and easier to remove the marks will be. A piece of 2” pipe would probably even work. Or maybe hold the pipe in position and tap it with a hammer.
I haven’t tried this process yet, but it’s right up there on the top of the “duh” scale, it’s so obvious. Slap! Red spot in the forehead.
Wayne says they’ve found information that says this is the way some of the ancients did it too. So, it’s historically correct cheating. You’ve gotta love it!
There is no Part Six, at least not yet. Sorry. Keep checking back. This making
a living thing is getting in the way.
In the mean time, wander around elsewhere in airbum.com. If nothing
else, you're a gun guy, so you will enjoy both Cobalt Blue and The
Stonewall File. These
are action novels for guys who like nuts and bolts detail combined
with unexpected plot lines. For sample chapters, go to Novels.