Zen and the Art of the Weld Puddle
Back in the 60's (which really isn't all that long ago for some of us), one of the tomes that was required reading for anyone seeking spiritual enlightenment and the right to wear a tie-dyed shirt was the book, Zen and the Art of Motorcycle Maintenance.
The basic premise of the book was that the spirit of the Buddha (don't get me off on religion, I was raised Methodist and didn't understand THAT either), could be invested in things mechanical, like a motorcycle, just as well as it could in living, breathing organisms. The author, Robert Pirsig, viewed the motorcycle as a mechanical- spiritual organism and the repair of it as a religious experience.
Yeah, I know. What does this have to do with welding?
I had totally forgotten the book until the other day when I was chasing the front edge of a weld bead down into the metal with my trusty Smith airline torch. My world totally disappeared and was replaced by one the size of a pea that glistened and flowed at the end of the fiery blue cone of my torch. As I sat there, postively disappearing into the warmth and liquidity at the very front edge of the tiny, molten puddle, I suddenly felt as if I, too, was having a religious experience, albeit, a hot one, but still an experience. It was as if the puddle was alive and I was trying to train it to do my command. It was no longer steel and fire. It was something growing that was striving to unite two pieces of inanimate steel into something with a soul that flies.
At the time I thought it probably was a good thing I escaped the 60's without having done drugs. If a weld puddle can send me off, LSD would probably have turned my brain into an ant farm.
I was concentrating so hard on the front 1/16 inch of that puddle that it seemed as if it was ten feet across and I was standing beside it, a tiny little conductor orchestrating the rhythm of the torch's dance. I was carefully placing the heat and rod in such a way that I could almost hear the metal begin to melt, then quietly flow together, the filler rod stepping in for just an instant to give the puddle more body and help bridge the gap.
It was at that moment I thought Pirsig may be right. I doubt if I can make a case for having seen the spirit of Buddha in a weld puddle (I'm from Nebraska, we don't have thoughts that ethereal), but I'll stand toe to toe with anyone and argue that the front 1/16 inch of the puddle actually does contain the kernel of life that we put into rag and tube flying machines.
Everything of any importance having to do with welding happens in that minuscule area at the very front of the puddle, where the metal melts and the union is forged.
The strength and beauty of the weld is determined entirely by what happens in that narrow band of heat, which is another way of saying your own life and that of your aircraft is also determined by what happens in that almost immeasurable part of the airframe.
Control the leading edge of the puddle and you've guaranteed yourself a lifetime of joy and happiness (in Zen words). In pilot terms, you've just written your own ticket for a hell of a lot of fun for a long time.
What we're about to do here is take a micro, micro approach to welding. We're going to ignore the controversies of the best way to cut tubing. We're not going to get drawn into the "weld into or out of a heat sink" controversy. We're going to have nothing to do with anything that exists more than the thickness of a nickel from the weld.
We're going to control the puddle.
First we probably should define exactly what it is that is supposed to be happening at the puddle edge. The short definition says the parent metal is supposed to be melting so that the weld penetrates a measurable distance into the metal. More discussion on that later.
Once the surface on both sides of the joint is melted and flowing, filler rod is supposed to be melted into the joint to help bridge the gap and to add more strength to the weld. Every farm kid knows this before he's out of kindergarten.
The real trick is knowing what the puddle is actually supposed to look like and what the welder can do to make it look that way.
The absolute first problem all welders have, but don't know they have is they don't have a clear picture in their mind of what the puddle is supposed to look like.
The second problem is they look at the puddle in general terms, rather than separating the leading edge away from it visually so they can concentrate on it.
A third problem that contributes to the situation of not concentrating on the leading edge is that their eyesight, regardless of how good they think it is, may not be strong enough to give them a clear image of the leading edge.
Taking the problems in reverse order, let's solve them. Regardless of how much of an eagle-eye you think you are, break down and buy a pair of those $12 reading glasses you see in racks in the drug store. Pick the lowest power they have, but get a pair.
It is difficult to make people understand how critical it is to actually see what is happening at the puddle's leading edge. If you don't clearly see it, you can't easily control it. You may be able to weld, but you are working the puddle in a general fashion, because that's the way you see it, not in a specific, detail-driven fashion.
As far as what the puddle and its leading edge are supposed to look like, it's difficult to tell it in words, so we'll try to combine it with the illustrations.
In the first place, although the joints in an airplane vary wildly and those changes from joint to joint do effect the puddle and the way it reacts, the basics of the puddle don't change, and what's happening at the leading edges stays absolutely constant. For that reason, most of our conversations will deal with an imaginary 90-degree tubing joint, like a vertical into a longeron. We'll make random comments on puddle behavior for other types of joints later.
Bet you didn't think we could drag a tiny subject like a weld puddle out this long, did you? Just wait! There's more exciting stuff to come!
First let's describe the ideal puddle. We'll get to the techniques of developing and controlling the puddle once we have it clearly in mind as to what it is supposed to look like.
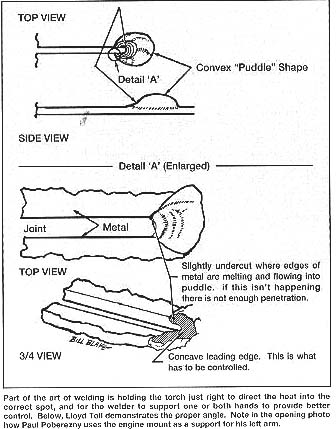
Viewed from directly above, the puddle should be a roughly circular area of molten metal that will vary in diameter depending on the torch tip, thickness of metal and the configuration of the joint. A "C" shaped bite will be taken out of the circular shape at the leading edge, where it is eating into the edges of the joint. If it was on an uninterrupted surface, the surface of the puddle would be convex, like a drop of water. However, since it is sitting on a crack and is eating part of the edges of that crack, the front edge is concave.
Yeah, I know, it's confusing; just look at the drawings, then it will make sense.
 The really important
features to notice, and those we are trying the hardest to influence,
is what the surface and edges of the parent metal look like right
at the interface where the puddle is melting into the surface.
What is happening at that interface is what determines the strength
of the weld. Nothing else counts.
The really important
features to notice, and those we are trying the hardest to influence,
is what the surface and edges of the parent metal look like right
at the interface where the puddle is melting into the surface.
What is happening at that interface is what determines the strength
of the weld. Nothing else counts.
You can have the ugliest weld in the world, but if it looked right at the interface, while welding, then it is still a safe weld. It can be a really pretty, smooth weld, but if the interface wasn't right, it has no strength.
The first thing you're looking for is that the square edge of the tubing cut is melting and flowing into the puddle and, if your eyes are really good, you'll see the edge is very, very slightly undercut by the puddle. The edge of the puddle should not be riding up on top the edge of the metal. The edge should be melted and flowing down into the puddle. If the puddle is riding up on top the edge of the tubing, it's not getting penetration. The edge absolutely has to be melted.
The smooth surface of the longeron, which has no exposed edge, should be melted, very slightly concave and should have clearly sucked the molten metal of the puddle into it, making it flow along the surface into the joint. This part of the joint can sometimes fool you! It is possible to "wet" the surface of the tubing with the torch and it will appear as if the rod is flowing on to it. However, when it is cooled you can chip it off with a screw driver. What you are looking for is unmistakable melting of the surface and a very, very gentle concavity right at the front edge of the puddle.
As we said, the diameter of the puddle will vary, but that variance will be much smaller than you think. It will always be about 1/4 inch and may widen out to 5/16 inch or even larger on acute-angle joints in clusters, but that's a function of the joint configuration and the bead bridging a gap, rather than the metal or torch tip.
Incidentally, it is because the bead is so wide in relation to the thickness of the material that it is difficult to get a bad weld, as long as it penetrates and doesn't get too hot and oxidize. Since we are working metal .035-063 inch thick, if we get penetration into the surface and the bead is 1/4 inch wide, we've got a tremendous amount of weld area in relation to the thickness of the metal. So, as long as there actually is penetration, the weld will be good. Period.
Equally as important as the way the puddle is shaped and how it is melting into the parent material is it's general "attitude." A weld puddle can have a personality and it's important you read that personality, since it has a direct effect on the strength of the weld.
The ideal puddle is a tranquil, golden bead with a yellowish glow (as seen through the glasses) and a slight skim of impurities floating on the surface. It isn't bubbling, it isn't sparking, it isn't doing anything but sitting there shimmering. Its general attitude is a little laid back and easy going.
If the puddle starts getting excited, you have to start asking yourself questions as to what's irritating it.
If the puddle loses color and starts bubbling, it is telling you it is too hot. Either turn down the torch, go to a smaller tip or change your rhythm so the rod is going in faster and you are moving ahead more quickly. A loss of color is your first indication there's too much heat for the amount of metal being worked. This is what happens when welding down towards the centerline of the longeron, where the vertical member has been cut so that the end of it forms "ears" that sort of wrap down around the longeron. The ears don't have much metal, so they heat up too quickly and get cooked. You'll be welding merrily along with a nice yellow, happy puddle, when suddenly the yellow goes white and the puddle starts boiling. It's talking to you and asking you to cool things off. Fast!
Even worse than simple bubbling is when the puddle starts throwing off sparks, along with bubbling. An occasional spark is okay, those are just impurities cooking off. What you don't want is a frantic puddle that is throwing off a string of sparks like fireworks. This means it is not only too hot, but it is oxidizing the metal because there's too much oxygen getting into the weld.
Oxidation is the worse thing that can happen to a weld. When that happens, the weld and the material close to it change crystalline structure completely, and everything in the area assumes the general strength characteristic of cheap peanut brittle.
Oxidation is generally caused by the torch needing re-adjusting. If the flame has been allowed to become oxygen-rich, this is easily seen by the loss of color in the inner cone of the flame and the shape of the cone changing from a gentle, slightly rounded, friendly looking cone shape to a harsh, straight-sided, pointed cone that looks angry. When that happens, stop welding right now and readjust the torch. Don't continue for a second.
Do yourself a favor: Before reading further, take a close look at the illustrations. It is really important we have it firmly in mind what the edge of the puddle is supposed to look like before we start talking technique.
Assuming the torch is correctly sized and adjusted, several things effect the shape and penetration of the puddle and therefore effect the shape and finish of the weld bead. The primary factors are:
· Distance of torch from weld
· Angle of torch to weld
· Rod insertion technique and rhythm
The distance of the torch from the weld is measured only from the tip of inner cone and determines how much heat is lost before it gets into the metal. The distance also determines how far the heat will diffuse, which in turn effects the width of the bead.
The cone should not be touching the surface and should generally be about the width of the cone from the surface. For most normal tips this will be 1/16 -3/32 inch.
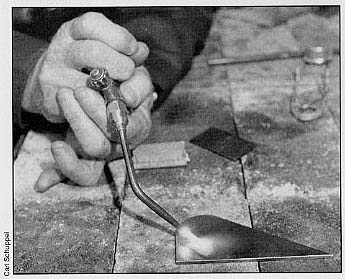
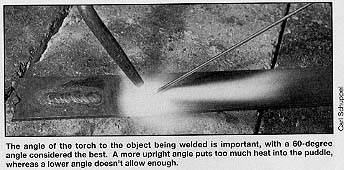
The angle of the cone should be about 60 degrees from horizontal. The steeper the angle (closer to vertical) the more heat is flowing into the joint. The flatter the angle, the more heat is flowing out in front of the joint. Picture it like a water hose pointed at a sidewalk. The heat flows the same as the water. Too vertical and it splatters out in all directions. Too flat, and it skips off the surface.
The rod insertion technique is important for a number of reasons, since a clumsy technique can make or break a weld.
The objective of the correct technique is to deposit just the right amount of rod into the puddle at the exact moment the puddle has melted sufficiently into the parent metal that it needs another droplet of rod to form another puddle.
It is important you understand that the rod should never touch the puddle. This is a common mistake that results in welding rods stuck to airplanes like porcupine quills, because the rod instantly cools the puddle and gets stuck. The insertion technique is to quickly poke the rod into the space between the cone and the puddle and remove it the instant metal melts off the end. There is so much heat in that gap it will instantly melt a small drop off the end of the rod and deposit it into the puddle, where it forms a new puddle that flows into the progressively melting parent metal.
It is also necessary for the welder to understand the rod material can act as a heat sink and have a cooling effect on the puddle. This can sometimes be used to advantage to cool off a weld, but generally it causes problems by stopping the weld cold (sorry, couldn't help myself).
A smooth rhythm should develop in which the torch melts the puddle, the rod is inserted, which forms a new puddle that melts into the surface, the rod is inserted again, etc. Each time the rod is inserted, a new puddle is formed and the characteristic "ringlet" pattern of the weld is formed.
Everyone wants to make welds that are pretty, in which the width is consistent and the ringlet pattern is even and smooth. The appearance of the weld, not necessarily the strength, is a strict function of:
· Holding the torch a consistent height above, and angle to, the surface. If either factor changes, the width and intensity of the welding heat changes which will change the width of the bead.
· "Reading" the puddle so the rod is consistently inserted at the exact same moment in the melting cycle every time. That doesn't mean the rod rhythm is always the same because the melting cycles will change, as the heatsink characteristics of the joint change, so the amount of time between rod insertions may change by a nanosecond or two.
· Depositing exactly the same amount of rod material every time, which is a function of how long the rod is left in the flame. The material is melted off the rod so quickly, the movement is more of a jab, than anything else, but it has to be the same every time.
A good looking weld is a function of consistency. One of the primary sources of inconsistency in welding is lack of support for the welding hands. Give yourself every break you can by supporting at least one hand against the side of the structure. Sit down, if you can, but if that's not practical, pull a tool box or step ladder over, so you have something to lean against. It is difficult to appreciate the dramatic effect good body and hand support has on producing consistent welds.
Some of the most common questions concerning the puddle have to do with how it acts in different joint situations and how techniques have to be modified to control the puddle. We can't cover every single joint, but we can hit enough of them that techniques can be extrapolated and modified to fit.
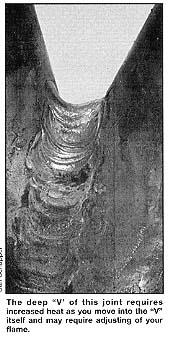
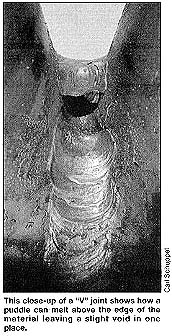
On an acute angle in a cluster, it is impossible to get the heat all the way down into the "V" where the two pieces of metal come together because the heat is so intense, holes will be blown in the tubing a ways up from the point of actual joint contact. In that situation the puddle actually bridges across the gap at the very top of the "V," leaving a void for a short disance. Don't worry about the void, since that causes less problems then trying to weld down in the "V." However, the rod technique will have to be modified so more rod is going in and it is walked from one side of the "V" to the other to put enough rod in to keep the bridge going.
In a situation where a thin piece is being welded to a thick one, bias the torch heat to the thicker one, in effect, directing the puddle off center. The puddle will wind up centered because the thin metal takes so much less heat to melt, it will draw the puddle material into it. The hard part is keeping from melting the thinner stuff away. To do this, angle the torch away from the thin stuff and periodically lift the torch for a second to let some of the heat go away. This is the kind of situation that tests your ability to direct the heat.
In running a bead around a cluster, there is always a point where the new bead runs over an old one. Try to plan the weld so, as the heat builds up in the joint as the bead progresses, you're working towards the old bead. That way the old bead will already be hot, and it won't be so hard to keep the puddle going. If that's impossible, just know you want to actually melt and weld your way through the old bead and that the second you hit the old bead, the puddle will cool off and you'll have to slow down to put extra heat into the old bead. Then, when you're through it, for a second there will be too much heat, and you'll have to back off for an instant.
There are about a thousand things about welding we didn't cover here, but that wasn't our purpose. We just wanted to make sure everyone who welds is conscious of how important it is to keep your mind and your skill directed at controlling the very front edge of the puddle. That's where it's all happening.
I'm still not sure about the Zen connection, but there is something powerful and mystical going on during welding. How else can you logically explain a process that takes medieval alchemy ingredients like fire and iron and converts them into beings that fly?
The only thing missing is the cauldron!
BD