How-To: Making a Wing Fairing
A truly amazing thing happens when someone takes the time to show you the basic concepts behind some of the more baffling secrets of aviation. Suddenly, the entire concept makes sense and it no longer looks like something only attainable by supermen.
That is exactly the way it is in forming aluminum into compound curves. From the outside it looks as if only Houdini could do it, but stand backstage and watch Houdini prepare his tricks and suddenly it's no longer magic. It is the simple application of understandable basic concepts.
Suddenly you find yourself saying, "Hey, I could do that."
That is what happens when you spend a few hours following Jim Younkin (the Houdini of aluminum) around at Historic Aviation in Springdale, Arkansas. Spend just a little time listening to him explain as he's hammering on a piece of aluminum, transforming it into a seemingly impossible shape, and suddenly you wonder why you've been wasting so much time using fiberglass.
Of course, in watching Jim, you are taking advantage of a 20 year learning curve. He's paid his dues and we're getting in for free.
If, in reading this article you learn nothing else, it should be that a vast portion of the aluminum fairings needed for an airplane can be made by the average craftsman and in a fraction of the time it takes to do the same part in fiberglass. And on top of that, the parts are much, much lighter.
Besides, it's great to be able to say, "...no, it's all aluminum..."
It is going to be impossible to cover all the different aspects of compound forming aluminum in anything shorter than a complete book or a two hour video, so in the interest of brevity, we're going to speak specifically about free forming aluminum using nothing but basic hand tools.
Also, there are a lot of different ways to form the same part, like beating it down into a form or rolling it, and we'll get into those in a later article. However, this one is focusing on the easiest, quickest way of forming aluminum and the way which is most useful to the most people.
 First the tools
Buy at least three different sizes of shot-filled plastic mallets,
a smallish ball peen hammer, and one or two of those plastic tipped
mini-mallets. You can grind those into specific shapes needed.
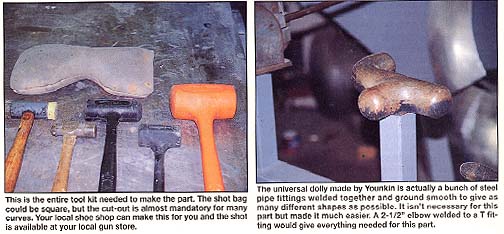
Then you'll need a shot bag: These can be bought from mail order automotive houses or they can easily be made at your local shoe shop out of medium-heavy leather. Just buy a bag of number 7 shotgun pellets at your local gun store and have a leather bag stitched up for it.
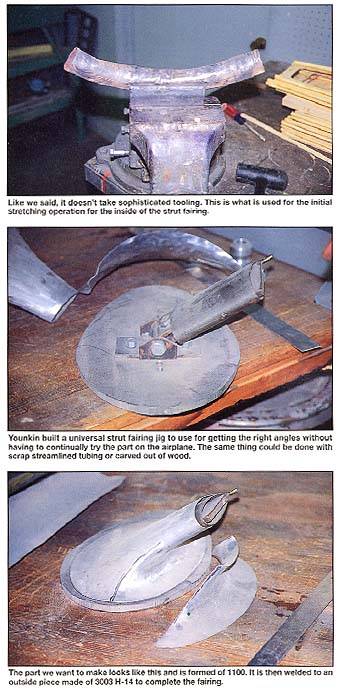
Then you'll need a box full of different sizes of steel pipe, pipe fittings, bent heavy tubing and just about anything made of steel you can use to hammer aluminum around. You could even sand a shape out of maple, if necessary. See the photos for the initial bend form Jim used for the inside of the strut fairing he was making.
You'll also need at least three different pairs of aviation snips, for straight, right and left hand cuts.
Material
In reality there are only two alloys to be concerned with and
Jim says to use the hardest one you can. For pieces which need
some strength and don't need a huge amount of stretching use 3003
H-14. This is an alloy that welds well and but it work hardens
as it is hammered and has to be annealed to do serious stretching.
It is also the exact aluminum your local heating contractor uses
for duct work.
A softer alloy is 1100, which does not work harden so it stretches really well. However, that isn't always good because, if you want some strength in the finished item, the 3003 will become harder as you work it so it winds up fairly strong. 1100 ends up just as soft as it started. In either alloy you'll usually be working .040" or .050" for deep pieces so you can sand it for a smoother surface.
Welding
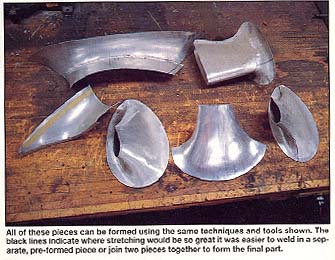
In many fairings it isn't necessary to do any welding, however
anything that wraps around something or has a huge amount of stretching
to do is best done in several pieces and then joined together.
Welding aluminum with oxy-acetylene is as close to a black art as anything can be, so not many folks do it. Welding it with TIG is much easier and is readily available as an outside skill at your local welding shop. Hydrogen welding with a torch is even easier, but you have to convert a gas bottle and regulator for the hydrogen and it is sometimes hard to get.
Probably the easiest thing to do, if you don't want to learn to weld aluminum, is to form the parts close to final shape and then have someone else weld them.
 The Techniques
The technique of forming aluminum is actually composed of several
parts, the first of which is understanding what it is you want
to do in the first place. If you look at any compound part and
analyze it, you can see where a particular edge has to be longer,
which means the material has to be stretched. Forming compound
curves is really nothing more than knowing exactly where the metal
has to be stretched and how much. There is usually much more stretching
than shrinking done, but shrinking can also be done with a hammer.
Especially on 1100. You just let it wrinkle and gently hammer
it in on itself.
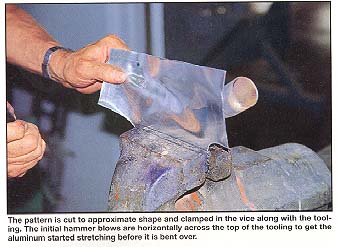
The flat blank you begin with is important because the closer the blank is to the right shape, the easier the process will be. If the areas to be stretched are visualized, it becomes obvious the less metal there is outside the stretched edge the easier it will be to stretch because you won't be stretching any excess. If the pattern isn't close, the excess material must be constantly trimmed off as it develops.
On larger fairings Younkin both makes a pattern and sees where most of the stretching will be is by forcing a flat piece of thin cardboard or heavy paper over an existing part, if available. If no part is available, he approximates the curves. Since the paper won't stretch to form into the compound areas, he makes cuts around the edges until it conforms. The gaps which develop between the "fingers" he cut show the amount of stretching in that area. By trimming the paper to shape with the fingers spread, when they relax into the flat form again, they form the exact flat pattern needed. Neat!
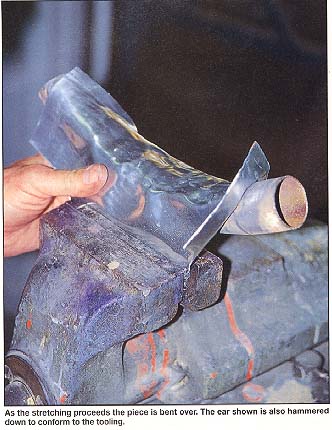
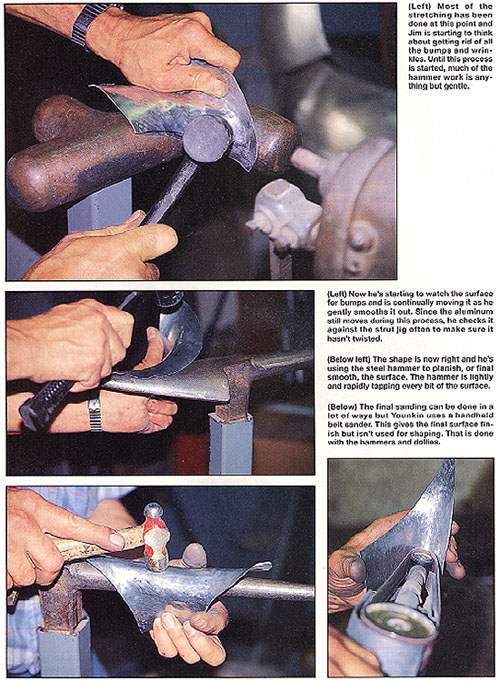
A word about the concept of stretching: It isn't done gently. Forget about finesse. The ball end of the ballpeen or a heavy plastic mallet is used to pound the area to be stretched into the shot bag and the entire process is nothing short of savage. As Jim puts it, "...you're making scrap." The object isn't to be smooth but to get the metal started stretching. It comes out of the bag bent and wrinkled and very scrap-like. Then it is taken to a dolly which has the approximate shape and the plastic mallets begin to work it smooth.
When the shape is close and you're worried about getting it really smooth, you resort to the flat side of the small ball peen or body hammer and very gently tap, tap, tap it smooth over a steel dolly. The dolly doesn't have to be the exact shape, but portions of it will match some of the curves and the aluminum is in constant movement across it.
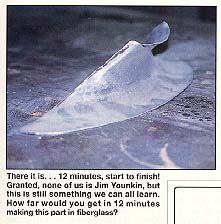
The important thing to know at this point is that this entire process takes minutes. Not hours. In fact, it took Jim 12 minutes to go from a flat piece of stock to a finished part for the inside of a strut fitting.
Since the process takes a relatively short period of time, you don't feel bad about scrapping a part and starting over. That's one of the beauties of this particular learning curve. In building small parts, it all happens so quickly, you make your mistakes, learn your lessons and move on to the next mistake in a matter of hours, not days.
This is very much a "show-me" skill. So study the pictures and it will all make sense.