The Shocking Truth:
Mounting the Rear Shocks
First we need to get something straight: I used tube shocks rather than some kind of lever shock for two reasons, the first being that the lever action shocks were too damn expensive. Second, I think tube shocks look very cool. That's all well and good, but lever shocks mounted backward in the inside of the frame rail would have worked much better.
When I started trying to figure out how to install tube shocks on the rear, I spent quite a bit of time going back and forth with myself exactly what kind and length I should get. As I started searching, however, the question pretty much answered itself because I didn't have a helluva lot of choices.
The distance between the frame, where I wanted to put the shock mount, and the rear end axle tubes was such I could only use Pete and Jake "shorties." Their max extension is something like 14" and they compress to about 9 1/2" (don't take those numbers as gospel—I'm too lazy to look them up) and the distance with the spring unloaded was right at 14" so the choice wasn't hard.
A choice that was hard, however, was that I wanted to use full covered shocks, only because they had the right look for the period. However, they weren't available in the short length. I soon found I was banging my head on the wrong wall anyway because, when I put the shocks in place it turns out the cover would have hit the rear cross member big time. The more modern, shaft type shock worked great and you'd have to get down on your back and slide under the car to see where they are mounted.
My choice of where to mount them on the differential was pretty much made for me too: Since the body was channeled, the edges of the fender wells came down over the axle tubes. This meant that either the shocks had to mounted vertically inside the fender wells or I had to whack BIG chunks out of the already-finished fender wells to mount the shocks at an angle outward. Need I tell you which won? I wasn't about to butcher up the little "tunnels" I had made through the fender wells for any reason.
Go to the pictures and let the captions explain how I did it. I don't know how the Boyd Coddington's or Pete and Jakes of the world would do it, but this is how an over-the-hill teenager from Nebraska did it.
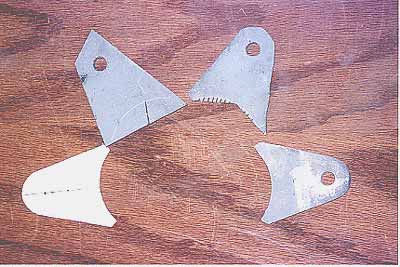
I normally make multiple fittings by stacking the number of blanks needed, in this case four, on top of one another and welding the corners. Then I drill the holes and bandsaw all four at the same time, which guarantees all of the parts match on another. In this case, however, I thought I'd show the process of doing fittings one at a time, going left to right:
1. An exact pattern is made in stiff poster board
2. The pattern outline is penciled on to flat stock (3/16") that I've hit with a thin coat of sandable gray primer so it'll take the pencil better. I center punch the hole, drill it and rough-cut the outline.
3. To cut the radius a long cut is made from either corner of the radius that intersect as close to the middle as possible. This gets rid of most of the material. Then a series of short cuts are made to the pencil line. Then it's easy to cut across the bottom of the short standing pieces to produce a rough radius. Then I get after it with a big half-round wood rasp.
4. The edges are sanded straight and smooth on a cheap Taiwanese 4 x 36 belt sander.
 |
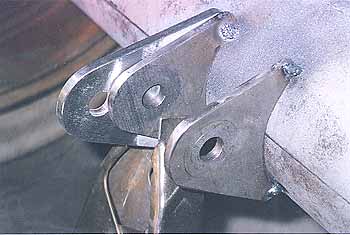
Oops! Dammit, when I tacked them in place and put a shock on them, I found they were too short. The shock didn't have enough clearance at the top. So, I made a set that was a little longer (rear). Note how all of the edges are broken and sanded to a slight radius and the edges of the holes are gently chamfered with a big (5/8") bit. I just think that kind of detail gives parts a more finished look. It also removes stress risers.
I was able to use the short fittings on the front radius rods for the lower mounts of the front shocks.
 |
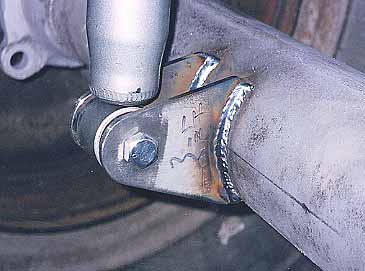
Here's how they looked during a trial fitting.
 |
I'm certain the web at the top was unnecessary, but, here again, I thought it made everything look a little more professional. Where the beads run on the top pieces, I've ground a chamfer in the edges of the top plate so most of the bead is below the surface.
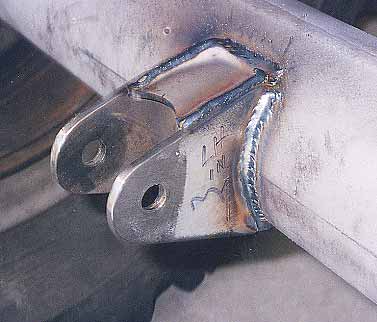 |
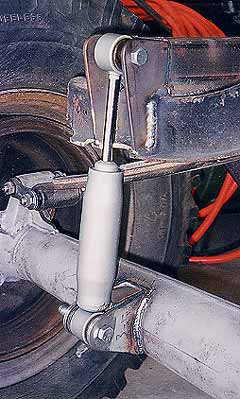
The final product. The top mount was made from 3/16" cold roll and mounted on the back end of the frame channels.
I'm positive this is all redundant stuff to most folks and probably crude compared to the way the billet boys build their high-buck rides, but I just thought I'd pass it along.
 |