
Body Barely Beautiful
"Making a denim purse (silk is too prissy) out of a bedraggled sow's ear"
This is as much a progress report on the body part of the project as anything else along with a little background.
First you have to understand where this body came from and that, in turn requires a little understanding about where I came from, physically and mentally, so bear with me.
|
My dad had a half hour radio show that aired at 11:30 a.m. from his place of business, the House of Davisson, which was a general store as might have been envisioned by P.T. Barnum on acid—lots of show biz, wild stuff on display, etc. It was located in Seward, Nebraska, at that time an atypical little farm community of less than 3,000 people. I say "atypical" because Seward had a major manufacturing plant, Hughes Brothers, that made cross arms for power poles, and we had Concordia Teachers College. These made the town a little more affluent and a little less likely to disappear off the map than most small farm communities. In fact, at the turn of the century, Seward County (population 14,000 in the 1950's) was supposedly one of the richest counties per capita in the US because we didn't have very many people but we had more than our share of millionaires so the stats were skewed.
Anyway, on dad's radio show, which was sort of a bizarre half hour of verbal mayhem that sounded a lot like Johnny Carson's show looked, he'd run all sorts of specials like, "Bring in your old kerosene lamp and we'll give you five dollars in trade on a new lamp." The result was be that we'd have antique kerosene lamps coming out the wazoo. And old washing machines. And cylindrical photograph players. Old guns. Whatever struck his fancy at the time.
I took advantage of that several times for my hotrodding, the first time to locate a roadster body. Because of the weather, states like Nebraska had a fewer percentage of roadsters than most because by the time the Model A and later cars came out people were willing to pay a little more to stay in out of the weather. A believe me, we had the weather. It's a fact that I was 26 years-old and living on the East Coast before I ever saw snow fall vertically. I'd always seen it whipping horizontally on a 30 knot wind. Not exactly roadster weather.
I put out the call for a Ford roadster of any kind and in a couple of weeks someone called in and said they had a Model A roadster body in a ditch on their farm. No details. No idea of what kind of condition it was in. Just that it was a roadster body. So, I got a couple of friends, loaded up the pick-up and wended my way out into the country to take a look.
 |
I should mention that getting a mud-filled roadster body out of a gully isn't as easy as it sounds like, even with four strong backs.
I've already mentioned how I butchered the body. A welding/cutting rig was one of the first tools I bought and I used it in abundance everywhere I could. For instance, when it came time to put brake pedals in the car, rather than mounting them in the frame, I'd seen a couple of magazine cars with overhead pedals out of a '54 Ford, so that's what I did. But first, I had to slobber-cut a huge hole in the gas tank and dash area so I could see what I was doing. Where anything needed stiffening, I simply brazed in a steel strap. I soon had straps woven together in a haphazard manner reminiscent of a web created by a stoned spider.
Knowing what I know now, I certainly could have done better by that old roadster body. On the other hand, if I hadn't rescued it from that gully it would have disappeared into the dirt long ago and wouldn't be sitting out in the garage still giving this gray beard hotrodder pleasure.
Saving The Roadster Body
When I called Lowell Krueger and he laughed about how much he had thought about that old roadster languishing in the back of the shed, I don't think either of us knew how much work it was going to take to set things straight.
Lowell had a serious emotional attachment to the car since that's where the seed was planted that blossomed into his little specialty body shop (Kruegers, 1331 Silver, Ashland, Nebraska 68003, 402-944-3536). He specializes in hotrods and antiques and is, to my mind, the best kept secret in that part of the country. He does great work and, believe me, he learned none of it from me. He really wanted to do this car, but I could only give him less than two months because another friend was going to trailer it down to Arizona for me then.
The trip with the flat bed hauling the old roadster up to Lowell's was a kick because people kept pulling up along side, honking and giving us the thumbs up. 'Seems like the old girl touched something in a lot of folks.
 |
What I needed for him to do was the stuff I knew I'd never get at, if left to my own devices. My schedule and life style (I make my living in a rather erratic, highly frantic fashion, as you'll see by looking around the rest of Airbum.com) wouldn't let me do a good job with the body. Looking back at it, I know I would probably have never gotten this far because the body would have been too much of a challenge for me to handle by myself.
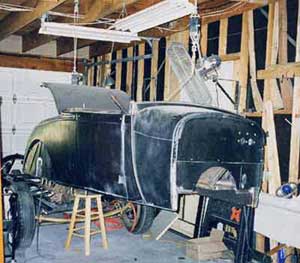
Lowell jumped into the project with both feet determined to give me the stiffest, squarest Mode A roadster body in history. And he did. He built a trusswork inside the body of one-inch square tubing that snakes around everywhere inside making it stiff and holding it as square as it was on his frame table. It is so stiff that, when you slam the doors on it, it sounds like a refridgerator. In that respect, it is very "unroadster like," which is a pleasant surprise.
When I jerked the roadster out of Lowell's clutches (he wanted to keep it another couple months and he'd have it on the road), he had finished the outside of the body, including creating and welding in a couple dozen patch panels, had most (not all) of the internal framing done and had created the floor boards you see in the pictures for the main cockpit area. In a bit of whimsy he used Model T running boards for the removeable portion of the floor boards which I love.
 |
The seats are what I originally had in the car and I lifted them out of a wrecked, WWII BT-13 Vultee trainer. In the '50's I simply had them sitting on the floor with a carriage bolt through their bottoms. The only cushions were seat bottoms from the seats out of the old Rivoli theater in town.
When I started to design a more practical (read that as less crude) mounting system I discovered two things: first the seats weren't identical, one was slightly wider then the other and secondly, military aircraft seats weren't designed to mount on their bottoms. They had mounts on the seat backs so they could adjust vertically up and down to compensate for different pilot's heights. The seat bottoms were actually quite fragile and I had almost nothing to attach to. I wound up having to make up attach angles that riveted to the sides and bottoms of each seat that spread the load enough (I hope) to let them survive in a road environment.
I attached the seats to an "H" shaped square tubing truss that sits on top of the floor bolts through to the frame mounts. This way the seat belts have really good anchoring. I'm also putting shoulder harnesses in (actually a 5-point harness left over from rebuilding my airplane).
 |
I was laying under the car one day just looking around (we all do that from time to time, don't we) and the thought occurred to me that I could create sort of internal rocker panel covers under the body that would not only clean up the appearance (read that as "cover up the ugly stuff") but would let the body lines more closely parallel the frame lines.
I was totally aware that not a single, solitary soul was ever going to see the bottom of that body, nor would they ever see the panels I envisioned building. But, that's not what building things is all about is it? Somehow, lavishing the time I knew as going to go into making the car look good to the casual observer on the outside but knowing all the time that the bottom looked like shit would drive me nuts. As I'm fond of saying, it would be like putting a tuxedo on over dirty underwear. Not that I ever wear the former or worry about the latter.
I pulled strings from the bottom, inside edges of the firewall and made "L"-shaped brackets that welded to the bottom of the tubing floor structure and to the bottom of the body edges at four points on each side. The strings gave me the reference where the edges of the "L"s should be. Then I folded 22 gauge metal and fit it to those "L" brackets all the way from the firewall to the real axle cut-outs in the wheel wells. At the back there was an area that I also knew wouldn't look good and could trap road debris so I made an actual box from the back of the seats to the axle cut-out to seal it all off from road crap. This was probably overkill, but I enjoy doing that kind of stuff, so....
 |
To fasten to panels in place I luckily had a bunch of stainless steel Tinnerman type machine nut plates that I just slide over the brackets and will screw them in place. Before I do that, however, I still have to sand blast the entire bottom of the car and I'm going to flood the rocker panel areas with primer and paint in an effort at getting as many invisible areas covered as possible. This is where crude works. I'll just keep blowing primer in until it drips out the bottom. Anyone have any better ideas?
As I make progress in this area, I'm going to come back in and rewrite or add to all of this, so keep your cyber-ear to the ground and revisit from time to time to see how it's moving ahead. I don't know, but I may decide to split the interior work into a separate progress report, so hang in and see what happens.
Later.
Here are a couple of extra shots. More on them later.
 |
 |